Coal Cookies

Monday, November 30, 2015 No comments
 I needed some gifts last year for my friends on the naughty list.  Which means....I had to double this recipe.  I've seen different versions of this treat around, but I found a free printable and tutorial at 1825.
If you have friends that meet these qualifications this year, all you need to do to throw these together is to prepare rice crispie treats as the box requires (usually 4 1/2 c. of the cereal added to 1/4 c butter and 1 10 oz bag of marshmallows that have been melted together on the stove.).  Add black dye...it takes a lot to go from purple to gray to black.  Instead of pressing it flat into a pan and cutting bars, just pull out clumps with a spoon you rub butter around (it'll stick to everything).  Place on wax paper to cool.  You can reshape a bit once it cools.  Bag.  Tag.  Deliver.  Save Santa some time.

Snowman Fan Blade

Friday, November 27, 2015 No comments
 I replaced a fan in my house last spring.  I kept the blades to transform into some crafts.  This is the 3rd of those six blades, though the rest are coming....
My friend Terry gave me some painting lessons to make this grungy guy.  I'll give a step by step soon, but....seriously...fan blades, how fun...and they already have the holes for hanging!  I'm thinking I need to replace ALL the fans in my house!

Happy Thanksgiving

Thursday, November 26, 2015 No comments
Be Thankful for What ...

Blessing Pumpkins

Tuesday, November 24, 2015 No comments
I made some lumpy pumpkins for Thanksgiving.  I (had my brother) cut them out of some wood I bought.  I used some paprika colored paint to color them orange and added some fun words and paint splattered with white paint.  I'm just not ready to say goodbye to fall, though I do love a good Christmas carol.  My friend Terry made some little pumpkins like these....I'm a little late to the game.  Next year...I'll start earlier, but in the meantime....it's time to bake!

Thanksgiving Cards

Monday, November 23, 2015 No comments
I try to send cards for most of the holidays.  Depending on my mood-I often buy them, but this year I've been TRYING to make them just because I like to craft, and....it makes me feel like I've put little more thought into the card.  I put together these cards to send out to some friends this month.  
I have a stack of cards from Hobby Lobby with muted tones.  I pulled a few of those.  I found these pumpkin 3-D stickers at Michael's.  I put a piece of Thanksgiving paper across the top.  I added a stamp and ribbon.  Quick, fun, and more affordable than the store bought variety.

Pesto Pasta Salad

Friday, November 20, 2015 No comments
I try so many new recipes...some are great, some are ter-rible.  I rarely write them on recipe cards b/c I have them on my blog.  I loved this recipe sooooo much that I wrote it on a recipe card b/c if an alien eats the internet and I lose all my recipes....I do NOT want to lose this one.  Yu-um.  It's also accidentally kind of healthy.  Bonus, leave out the cheese cubes, and make sure your pasta doesn't contain eggs and it's also vegan.  My brother has been residing at my house the last few months and he's vegan.  I made this and only put the cheese in mine....it wasn't even necessary.  Sometimes I chase cheese wanting it with each bite, but with this dish-all the other pieces have so much flavor you can take it or leave it (I liked it even better the second day when I reheated the pasta and the mozerella melted a little more).  The original recipe came from damndelicious.
OK...so....try this out-trust me not much makes the recipe card these days and just typing this makes me want to go make it again.
Pesto Pasta Salad
Ingredients:  8 oz med shell pasta, 1 lb asparagus (trimmed), 2 T olive oil, salt and pepper (to taste), 1/2 c. pesto, 1/3 c sun dried tomatoes in olive oil (drained and julienned), 1/3 c diced mozzarella cube, fried egg (optional)
Instructions:  
1.  Heat the oven to 425.  Spray a baking sheet with nonstick spray.  Place trimmed asparagus in a single layer on baking sheet.  Drizzle with olive oil, salt and pepper and toss to combine.  Roast for 8-12 minutes (should be tender and crisp).  Cool and cut into 1 inch pieces.  
2.  Boil shell pasta per package instructions.  Drain and add asparagus, pesto, sun dried tomatoes, mozzarella and a fried egg (if you want).  

Chicken Spaghetti

Thursday, November 19, 2015 No comments
Hello cooler weather.  Winter says casseroles...really....I was raised on casseroles, so....it's not really a seasonal thing, but you can eat heartier foods in the winter b/c you can wear sweaters to cover up those calories.
Really, some meals are just worth it.  I've always loved chicken spaghetti.  As a single, I can't...or rather, shouldn't eat a whole pan of it in a week, plus it gets old...so I love to bake it up, cut it into squares, and then freeze them on pieces of wax paper and put it in a freezer container.  I pull them out every few weeks and heat it up.
I tried out this recently from PioneerWoman.  No surprise, it's a good one!  The only thing I did was that instead of two cans of mushroom soup, I used 1 can of mushroom and 1 can of chicken soup.

Birthday Cards

Tuesday, November 17, 2015 No comments
 I made these birthday cards in my quest to make all my cards by hand this year.  They were super simple to put together, and I loved the turquoise and yellow colors.  I found some polka dot blank cards at Hobby Lobby I used for the backdrop.  I added some ribbon/washi/sticky gems etc to the sides of each picture.
I found the pictures on pinterest by searching for 'vintage birthday pictures.'  I copied and pasted the old card images to word and then printed them off on computer printable overheads.  You can get these at office supply stores.  I didn't take any photo of the birthday prints before I glued them down (with a glue stick), but here is a Valentine's picture I have for future card making.  

Easy and Delicious Pecan Pie

Monday, November 16, 2015 3 comments
Last year I wanted to try out a different version of pecan pie. I found this one on allrecipes and I have fallen in love.  It's so delicious, the brown sugar makes it, and you don't have to add all that Karo syrup-I pretend this somehow makes it healthier, but it definitely makes it more affordable, and much easier to throw together.  This little fellow will definitely be making an appearance again on my tables this holiday.
Pecan Pie Recipe
Ingredients:   1 c brown sugar, 1/4 c white sugar, 1/2c butter (melted and slightly cooled), 2 eggs (at room temp), 1 T flour, 1 T milk, 1 t. vanilla, 1 c.chopped pecans, 9 inch deep dish pie shell.
Instructions:
1.  Preheat over 400 degrees.
2.  Beat the eggs until foamy.  Stir in the melted butter.  Stir in the white sugar, brown sugar, and flour.  Add the milk, vanilla, and nuts.
3.  Pour mix into pie shell.  Bake for 10 minutes at 400.  Reduce heat to 350 and bake for 50 more minutes (center should not wiggle too much when it is done).

Yolanda's Bridal Tea

Friday, November 13, 2015 No comments
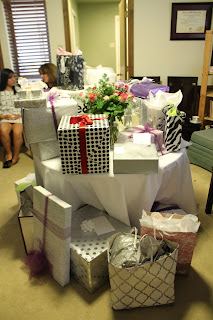
 On Halloween, I helped host a shower for my friend Yolanda.  There were four of us on the committee and the other gals had a ton of great items for hosting a tea.  Yolanda loves her teas...in particular, teas at the Ritz.
 One of the host had all these tea cups and tea pots.  How gorgeous?  The guest list included 70 invites and about 34 yes responses.  Most of these cups and punch glasses got used.
 Tea selection.
 We each tried to bring 'tea like dishes.
 Scones, a variety of jams, and clotted cream (bought from the store....yikes to the directions that goes into producing this little dollop of goodness).
 Petite Fours....my favorite.
 Gifts.
Fun side note, one of the gals hosting had seen this 'game' where you wrap a bag of dates, kisses, and bottle of shout  You place them among the gifts and when the bride unwraps them, they have to tell about their first date, first kiss, and their first fight.  Games make me cringe, but this one was just right for a group of host that decided we did NOT want to do any games, but we did want to make it a little personal.  Tonight is the rehearsal, tomorrow is the wedding.  I can't wait to see what life brings next.  

Thanksgiving Ideas

Thursday, November 12, 2015 No comments
I usually try to post the projects I'm presenting on GMT prior to being on GMT...but....that didn't happen today.  How about a link to the segment instead?
Check Out the Video Here

Apple Pie Bread

Tuesday, November 10, 2015 No comments
 I love bread.  I love fall.  I'm a fan of apples.  This one hits all the marks.  the crumble top definitely makes it happen.  I originally found this recipe on mybakingaddiction and had to give it a try as the thermometer went below 90...finally...a few weeks ago!
Apple Pie Bread
Ingredients:  1/2 c butter (softened), 1/2 c sugar, 1/2 c brown sugar, 1/4 c buttermilk, 2 t baking powder, 2 eggs, 1 1/2 t vanilla, 2 c flour, 2 t homemade apple pie spice, 1/2 t salt, 2 c. apples (peeled and grated, 3/4 c. pecans (chopped), 1/2 c cranberries (optional)
Crumble Top:  1/4 c brown sugar, 3 T flour, 1/4 t apple pie spice, 2 T butter, 1/3 c pecans (chopped)
Instructions:
1.  With a mixer, beat the butter for about 30 seconds.  Add the sugar and mix well.
2.  Add buttermilk and baking powder.  Beat.
3.  Add eggs and vanilla, beat until combined.
4.  In a second bowl, toss the flour, apple pie spice, and salt.
5.  Add flour mix to wet mix on low.
6.  Fold in apples, pecans, and cranberries.
7.  Place in sprayed 9x5 bread pan.
8.  Mix the Crumble Topping.  Spoon over bread and press down gently.
9.  Bake at 350 for 60 minutes (until toothpick comes out clean).

Gingerbread Face Jars

Monday, November 09, 2015 No comments
 A friend of mine gave me a ton of old baby jars she found in her attic.  So far I've made pumpkin jars and snowman jars, but...I've got a lot of jars left.  Now....gingerbread face jars.
I have about fifteen of these now that can be filled with Christmas treats.  After painting them I put a layer of clear polycrylic paint  so it won't scratch, and the shine really makes everything look better.

Mason Jar Lid Peppermint Garland

Friday, November 06, 2015 No comments
 I recently did a fall craft recently using the rims of old mason jar lids...which left me with the lids.
 I decided to paint them and make them looking like peppermints.
 I glued them back to back on twine.
 I used old cellophane from a gift (I knew those hoarding tendencies would come in handy) and tied each side with twine to complete my peppermint look!
I created a string of seven of these little guys.  They hang flat against a wall, but do like to spin some when dangling, thus the two sided approach.  

Baby Jesus Wood Sign

Thursday, November 05, 2015 No comments
I had this old piece of wood hanging around my house for the last few years.  It was the lid of an ammo box turned planter.  It turns out bugs like wet wood, so....I came up with a plan b b/c I don't love bugs.  I took the lid off....and I decided to add this to my Christmas collection.  I took another piece of old wood and had the edges rounded  I painted the 'face' and added eyes, and then wrapped it in swaddling cloth.  I put some Spanish moss behind baby Jesus and then nailed it into place.  I painted up a star (pre cut from the craft store).  I painted one of my favorite sayings.  Now....I'm ready for Christmas...or at least....Christmas decorating.