Tortellini Salad

Monday, March 31, 2014 No comments
Here's a really easy salad, and I love the change up of Caesar dressing instead of the usual Italian....I love it....you can use any version of cheese on hand....seriously a great little side for a potluck or cookout or breakfast...whatever floats your boat.
Tortellini Salad
Ingredients:  20 oz pkg refridgerated cheese tortellini, 1 c. fresh mozerella (cubed), 1 c. pepperoni (chopped), 1 c. cherry tomatoes (cut in half), 1/3 c. fresh basil (chopped), 2/3 c. Caesar salad dressing, salt and pepper to taste.
Instructions:  Cook the pasta according to the package. Drain and rinse with cool water, drain again.
Mix the other ingredients with the pasta and toss.  Place in the fridge for at least an hour before serving.

More Bows...

Friday, March 28, 2014 No comments
 There are twelve step programs for people like....I heart making bows....I think mostly b/c you can make these for mere pennies.  Seriously.  The above bows I made using only scraps for a friend of mine that just had a baby girl.  Some of these styles I've done before...but there are a few new ones I tried out....
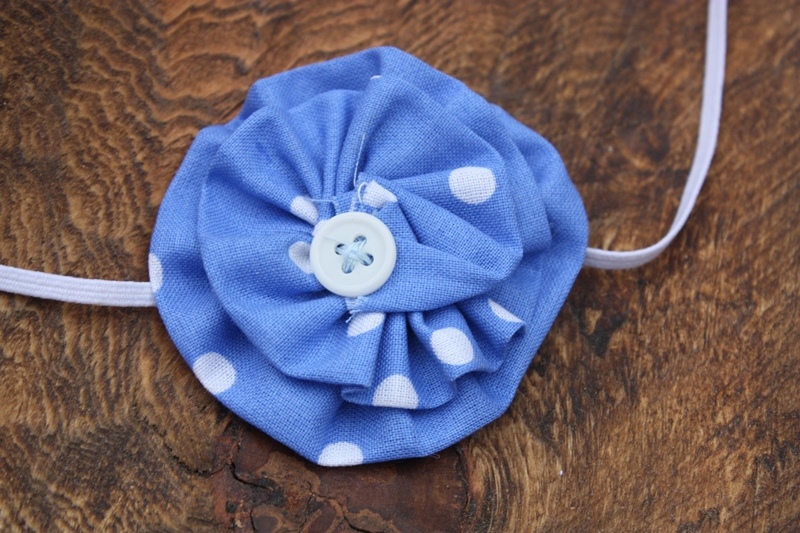
This one reminds me of a yoyo.  She wanted a bright blue bow and I had this fabric left over from a project where I decided on a darker blue at the last minute....I could make about 30 more of these with that fabric....whoops.
 Super simple.  I cut a strip about 20 inches by 1 1/2 inches.
 I stitched loosely up the length of the fabric fabric, folding it together.
 I then started pulling the fabric and wrapping it around it circles until I had what I wanted.  I sewed all of those layers together and added a button to the middle, then add some elastic.
 This next flower I used another strip about the same size, but just rolled it around and around.  Here is a tutorial.  I glued it all down to a piece of fabric, attached felt leaves and elastic and then added one more piece of fabric with hot glue to cover that all up.
 I made this little felt flower.  Here is that super simple tutorial.  Made from scraps from a felt road I made for my nephew.
 For this bottom flower (my favorite), I used this felt flower tutorial.  I used scraps from a project I had leftover white fabric.  When I make these with felt, I cut six circles and fold them into fourths, but since fabric is so much lighter, I used 8 and overlapped the second set where the creases were.  Then I added two pearls and a crystal bead.
 I hot glued the elastic, then covered my mess with a little circle of fabric.

60 Blows!

Thursday, March 27, 2014 1 comment
 I saw this on Pinterest.....and a friend of mine was looking for something fun to bring her Mom to celebrate her 60th....instead of a card.....I've been wanting to try this out, and so....I did.  So simple, jar-candle-gum.
 I little something to celebrate the birthday....and a little something left for the grandkids to enjoy after.

Play Tea: Sugar Cubes and Lemon Slices

Wednesday, March 26, 2014 1 comment
Here's part two of three of a birthday gift I'm working on for Blythe.  There is a tea party involved in this one.  I try to make gifts based on books.  I posted about the little fabric tea bags I made yesterday with some scraps I had left over from a quilt.  I usually toss fabric this small, so this was the perfect solution.  I decided every good tea service has lemon and sugar cubes.
I took some felt (yellow and white) and cut out some lemon shapes.  Here is a free template for those.
 I then sewed them all together, but you could use fabric glue as well.
 Finished....
 For the cubes, I bought some little wood squares at the craft store in the unfinished wood section.  They have these in all sizes.  You could paint them white, or even get some glittery white paint.  I used what I had on hand.  I sprayed them white, then sprayed them with glue and rolled them in glitter.
 Finished...
 Every great project includes a little glitter.  This also applies for all work projects.
 Here is the finished set.  For now.  There will be more.  Soon.

Fabric Play Tea Bags

Tuesday, March 25, 2014 No comments
 I had a bunch of tiny scraps of 20's style fabrics left over from a quilt this summer.  I decided to make little fabric tea bags to go along with a birthday gift I'm currently working on for my niece.  There is a theme.  It involves a book.  No doubt, this won't be the last I write about it, but it is the start.  These were super simple to put together, cheap, and affordable.  I drew out a little template you can download for free here.  Instead of sewing the edges, I used pinking sheers to cut out the template so it just had a fun edge.  I doubled the fabric and put the two back sides facing each other.  I sewed around everything but the top of the tea bag, and 3/4 the way around the little square tabs.
I bought some then rick rack, but any thin ribbon or string would do.  I inserted a small piece (about 4 inches) into the open top of the tea bag, and the 1 open side of the tab.  I then sewed over that so it was attached.  It would be cute to put a little stuffing inside as well, but I was working with the supplies on hand.  If you aren't into sewing, you could also us fabric glue and put these together.  Up next lemons and sugar cubes...

Cashew Chicken Salad

Monday, March 24, 2014 No comments
 When I first saw this recipe (via Dean McDermott's website) I was a little skeptical of the ingredients, but since I've developed a weird love for chicken salad over the last few years, I decided to give it a go.  Man, it's a good one.  In my head, it's 'lighter' tasting than some of the really creamy salads, you can substitute the mayo with yogurt, and there are actually some healthy things hiding in this tasty salad.
Cashew Chicken Salad
1 whole roasted chicken, shredded (I boiled four individual size pieces of chicken and cut these into small cubes), 1/8 c. white wine vinegar (to taste, don't pour too much in, it's strong, but tasty), 3/4 c. red grapes (halved), 1/2 c. cashews (halved), 1/2 c. red onion (diced), 3/4 c. mayo or plain yogurt, juice and zest of 1 lemon.  Mix all these together and place in the fridge for a few hours or overnight before serving.

Throw Pillows

Friday, March 21, 2014 No comments
 I'm in the process of redoing my room.  I made this headboard out of old pallets, which I blogged about last month.  This photo isn't the finished product, but it's getting there.  I bought a few pillows for my bed-but found that the pillows I wanted were not for the price I was willing to pay.  I decided to make a few of my own.  I saw a pillow similar to this pillow I made for 40 bucks.  I just wanted some different textures, so here was my attempt at saving money and adding pizazz.
I bought a pillow filler I used the plastic bag it came in as my pattern size since it fit nicely around the pillow, I figured it was about the size I wanted.  I took some white fabric and I cut 5 the same size.  I pinned four of them together in one big stack (and reserved the last one for the back of the pillow).
 I then took my machine and I just sewed diagonal strips across the entire thing.
 I took a pair of scissors and I cut down the middle of the top three layers (leave the last one solid).
 Until the three top layers were all cut.
 I then pinned it inside out to the 5th piece I had set aside (the frayed edge actually my 'outside').  I sewed three and 1/2 sides, stuff the pillow inside, and finished it off.
 Finished.
 I also made the little neck pillow by making and oversize sleeve, then tying both sides closed with some old lace I bought awhile ago at an antique store.
 Peanut has added a little something to the finished product. I don't know how I feel about it, but I know who's going to lose this battle....and it won't be Peanut.

Slow Cooker Pulled Pork

Thursday, March 20, 2014 No comments
 I'm always excited when I find a tasty recipe.  That you can cook in the crockpot.  Which really means-a bunch of ingredients you can toss in a pot and let magic cook for you.  This one is a keeper in my book-and perfect for football season, or better-summer when you want that grill taste but not that 'hot house' because you are roasting meat, or mosquito visitors as you hang out outside.
Crockpot Pulled Pork Recipe
Ingredients:  4-6 lb pork shoulder or pork butt (remove the netting), 1/4 .c liquid smoke (found near the steak sauces) 2 medium onions (sliced), 1 c. apple cider vinegar, 2 T brown sugar, 1 T chili powder, 1 T. salt, 1/2 t. cumin, 1/2 t. paprika, 1/2 t. dry mustard.
Instructions:  Put the onions and apple cider in the bottom of a crockpot.  Pour the liquid smoke over the pork.  Coat all sides.  Mix all the dry ingredients and coat the pork.  Cook on low for 10 hours, or high for 7-8 hours.  Shred and serve on a bun with your favorite bbq sauce.

A Bright Smile=Faux Silver Polish

Wednesday, March 19, 2014 1 comment
 Last week was my spring break.  Good times were had.  My house is a mess, but....I found quite a load at antique shops and thrift stores all over Texas to keep me busy for the next few weeks.  Here is a small sampling of one day's loot.  I spent very little money on lots of cool doodads.
 BUT....here's a little tip I learned years ago...and perhaps you already know, but...just in case:  I found this great coffee warmer for 7 bucks!  That's nuts!  One of my friends was hosting a shower over the weekend and we were chatting about ways to keep coffee warm without having to plug in a big ugly pot.  She was going to look at a local home goods store for a coffee pot...but low and behold...I found this.  It was tarnished...which I kind of like, but...assuming all her guest didn't...I figured I could let it tarnish again once it lived at my house, but in the meantime, I pulled out an old favorite trick I've applied in the past to some silver jewelry that lost it's shine....toothpaste and an old toothbrush!
 Literally, just take your paste covered brush and scrub all over your silver.  Rinse....
 ...and here's a before and after.  The after is at night-I had to ship her off before good light, but...you get the point (ignore the moisture inside....I was cleaning out the antique store grime.  You can repeat as many times as you want, but it's kind of an amazing deal.
In this little coffee pots case-add a tea light to the bottom and....just as soon as I learn how to MAKE coffee....I'll give her a go...in the meantime-she made her first debut this weekend...hopefully the first of many fun appearances.  Now....to put those other fun items to use...