Ornaments: The Day You Were Born Newspaper

Friday, November 30, 2012 2 comments
 My cousin-in-law blessed our family with the newest member to our family December 29, 2011.  I have seen newspaper covered ornaments on the internet, but I decided to apply this idea using the headlines on the paper on the day Jonathan Noel was born.  I used a paper mache ornament I bought at the craft store. 
 I cut out all the headlines, weather, cartoons from the day, the price of cars, the stock market news, movie advertisements, TV schedules, etc, and glued them to the ornament's faces.  I then used adhesive spray glue and glitter to make it festive. 
 I added a ribbon, and the date and Jonathan's name and birth information to a tag on top. 
 Jonathan will be able to look back over the years and see some of the things that shaped the world on the day he was born, as he continues to shape ours on each day that followed this blessing. 

Ornaments: Chalkboard Ornaments

Thursday, November 29, 2012 No comments
This was a project that happened by accident.  I was spraying a small rectangle on these in order to make place cards that you can write someone's name on, and I got a little messy...and a little spray can wild, and I realized I had more of ornament sized chalkboard, as opposed to an ornament with a squared off chalkboard name plate...so....teacher gifts for friends, yay!  This would be cute for a school's office decor, or class, but for me, present toppers for my teacher friends!  One thing that worked well were 'plastic' ornaments I grabbed last year at the Target dollar spot, the paint held nicely and didn't flake off, AND....dropping these on the floor=no negative experiences!

Ornaments: Painted Dough Ornaments

Wednesday, November 28, 2012 3 comments
 When Blythe was a baby, she came to Texas and spent her first Christmas with us.  It was truly a precious memory, and I got to start a tradition with her that we have been carrying forward, and I hope will mean a lot to her in the future.  That first year we took her hand print and pressed it on a glass ornament I filled with 'snow' to also commemorate her first white Christmas.  The next year I made a gingerbread shaped ornament and pressed her thumb into it.  This year, she was finally old enough to do a little more than be held still while we pressed random digits into materials.  I used a really simple recipe to make up some dough ornaments. 
 Dough Ornament Recipe:  2 c. flour, 1/2 c. salt, 3/4 c. water.  Mix, knead, roll out to about 1/8 inch (this made 6 Christmas tree cookie cutter shaped ornaments). Cut out, I inserted a hole using a straw to thread later with string, and then and baked for 2 hours at 250. 
 Once they were cooled, I gave Blythe some paint (you can use, whatever-watercolor, glitter and glue, etc), and she went to town. 
 She soon adopted a technique for dipping her brush in every color before decorating, which accidently turned out to be a reddish color, and green. 
 She was really proud and kept asking anyone who walked by to look and see what she was doing.  She worked super hard, and only paint a portion of her face in the process, certainly less damage than I do when painting!  I had her mama write her name and the year on the back, and then I used a clear coat of spray paint on both sides to give them a little extra protection against aging.  Wish that  would work on me...
 I threaded some ribbon through the holes...
 And Blythe has ornament #3 to add to her tree.  We are actually now going to be working on ornament 4, and this year we will be incorporating her little brother in the mix. 

Ornaments: Peppermint Bath Salt Ornament

Tuesday, November 27, 2012 No comments
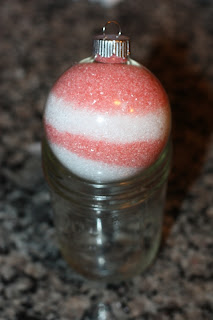
 I made this scrub last year and scented it with peppermint oil.  I added it to jars in striped layers and a few other packaging options I'll post about in a few weeks, but I also added it to one of my favorite Christmas vessels....the empty glass ornament.  I used a funnel to layer the dyed salt. 
 I added a little slip of foil to the top so it wouldn't spill out the holes.
 Insert the top 'thingie' and bejewel, beribbon, betag, it beaffordable for a b(e)iggroup.....

Ornaments: Chihuahua Ornament

Monday, November 26, 2012 4 comments

 As soon as I acquired Peanut from his owner (my brother), with minimal tears, and much nagging, I realized he needed an ornament.  All my pets have an ornament on my tree. Uhhh, they don't sell cute chihuahua ornaments? I used to be of the former party that believed the chihuahua wasn't the most precious, adorable, cutest, most beautimous creature on planet earth, but I've seen the light, and what do the stores mean by these strange renditions of the 'chihuahau' that don't in anyway capture how stupendous the breed is?  After two years of hunting, I gave up and made my own.  On a hut for reindeer something or rathers I saw a cute reindeer ornament I modeled this after.  Subtract those antlers, add those radar ears, and you've got yourself a Peanut. 
I involved Peanut in the process, from selecting the perfect shade of brown...
 To face measurements. 
 I stitched his name on one side, so visitors with less artistic vision wouldn't mistake this for a deer on my tree.  Psssh.
 I added those big ears by pinching one end.  Peanut was involved b/c he takes this sort of thing seriously....and because he's always glued to my side....my leg....my head.  Whatever he can get closest to, that's where he is at.  Homeboy doesn't have an independent streak anywhere in that little body. 
 He makes a nice project rest. 
 After stitching the face, I added a little stuffing, and stuffed the side with the name, and the face together, and I included a ribbon for hanging, and a bell for holiday sake. 
 I think he was moved. 

Gingerbread Buttons

Friday, November 23, 2012 No comments
I love gingerbread.  Here are 9 previous post and links to projects and recipes from past years, though there are so many...more than nine, I had to create a 'gingerbread' label.  I don't know why.  I don't need to know why. It's a pretty innocent love. So, when I saw this recipe on Peabody's site, and I knew it was speaking my language.  I love gingerbread cookies, but I especially like SOFT gingerbread cookies.  These were easy, and they did not disappoint! 
Gingerbread Button Cookie Recipe
Ingredients:  3 c. flour, 2 t. ginger, 1 t. cinnamon, 1 t. baking soda, 1/4 t. nutmeg, 1/4 t. salt, 3/4 c. (1 1/2 sticks) unsalted butter, at room temperature, 3/4 c. packed brown sugar, 1/2 c. molasses, 1 egg, 1/4 c. sugar,.
1 t. vanilla, 1 c. white chocolate chips (I used melting chocolate that comes in round pellets/various colors)
Instructions:  
1.  Mix flour, ginger, cinnamon, baking soda, nutmeg and salt in a big bowl.
2.  Beat butter and brown sugar in a bowl with  mixer on med. until light and fluffy (I never got it to be light and fluffy, I had to use a rubber spatula to finish combining it together, maybe my butter wasn't quite soft enough).
3.  Add molasses, egg and vanilla to butter mix and beat well.
4.  Slowly add in flour mixture on low  until well mixed.
5.  Press dough into a thick flat disk. Wrap in plastic wrap. Refrigerate 4 hours or overnight.

6.  Preheat oven to 350°F.
7.  Shape dough into 1-inch balls and roll in  sugar. Place on ungreased baking sheets. You should be able to make about 4 dozen cookies.
8.  Bake 8 to 10 minutes or until edges of cookies just begin to brown.
Quickly  press about 6 white chocolate chips into center of each cookie, or one of the melting chocolate pellets.
Cool and store cookies in airtight container up to 5 days (or so the original instructions say from McCormick, mine didn't last two days).

Thankful....

Thursday, November 22, 2012 No comments
Today I'm thankful for turkey, and my grandmother's dressing recipe.  She left this earth far too long ago, and has been joined by some really incredible people through the years, but I love the link a recipe brings from what once was, and what still is....
I'm thankful for friends that surround me....the fun memories we've made this year, the funny text we exchange, and long phone calls, cards, hugs, pictures, yogurt and bagel dates....there isn't enough time on this side of eternity to get to make as many memories  as I'd like with each person, but I'm grateful to know these sisters and brothers are part of my life into eternity. 
I'm grateful for a church home, a pastor who speaks the truth, and the ability to learn and share my faith with others. 
I'm grateful for a job...or four.  The people I work with, the people I get to meet and the fact that I still love my job more days than I want to run far far away. 
I'm thankful for puppies.  A slice of happiness in each day that never fails. 
I'm thankful for the long runs  and the fact that my body allows me to complete and then complain about these little jaunts around Texas. 
I'm thankful for my family-the fact that these family relationships have become friendships too and that even when given a choice-I'd still choose to be right here with these people on this day. 

Four Holiday Candle Ideas...Cheap

Wednesday, November 21, 2012 No comments
 I'm headed to Good Morning, Texas today to share some oober affordable ideas for lighting up the holiday table.  I'll add the link to facebook later, but just in case you have, like, a turkey to bake or something and don't feel like watching....here is a pictorial how to....
#1.  Wine Glass Candle Holders. 
I bought 16 oz cups and cut off the top. 
 I measured around and created a template to use to cut out strips of scrapbook paper.  Here is a copy of the template you can download. 
 I just taped it onto the cup (you could also just use the paper if it's thick enough).  I added a little left over crepe paper for a fringe.  This slips right over a wine glass.  These would be really cute to personal for each guest to have by their place setting. I just used a little glue to hold it in place. Slip a tea light inside. 
#2  Decorate your own candles....
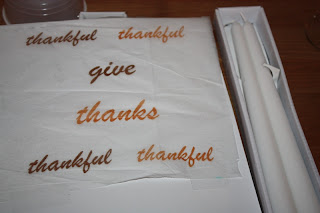
 I taped some tissue to a piece of cardstock and I printed off some various Thanksgiving words. 
 I cut them down to size, and then grabbed some candles at the dollar store (two for a dollar). 
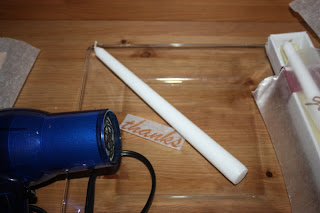
 I held it in place with a piece of wax paper, and then I held a hot hair dryer against the candle until the wax melted just enough for the tissue to cling to the candle. 
 It took a few minutes, but it adhered so completely that they blend and you can't tell. The wax paper helps hold it in place, gives you a little space from your hand and the heat, and helps them melt evenly.   When the candle burns and hits the tissue it will give the flame a little umph, but no fire department should be called assuming you don't have your newspaper collection suspended above.  This would also work for pillar candles-vintage Santa pictures, or family photos, hand written notes from family etc etc. 
#3 Decorate Tea Lights
 I traced a tea light onto tissue paper. 
 I cut out circles and then used a stamp and stamped snowflakes on top.  One little trick-instead of ink on stamps-a lot of times I just color the stamp with a marker-much cheaper and less space to store all those different colored inks. 
 Stamp the snowflakes.  I used a punch to cut out the center...
 I slipped it on top and then just heated up the wax a little with my hair dryer.  Again, it will flare a tiny bit when the candle starts to burn, but I think they are pretty cute....it would be fun to add these to a candle holder etc for a small Christmas gift.  I saw this idea here
 4.  Snowmen Tea Light
Last up-(my filler in case they tell me to keep talking)....plus I saw this on google images and thought it was cute.....
I just took an electric tea light (3 for a dollar from the dollar store) and colored a snowman face on with a sharpie....the light=the nose.