How 'Bout Them Rangers?

Sunday, October 31, 2010 3 comments
I'll get back to crafts tomorrow, but I have to pause because this world series has been a long time coming!  My family has always been 'baseball.' 
My brother and I grew up going to games, watching Nolan Ryan pitch, Pudge catch, and the Rangers win....upon occasion.  A hot dog, a ball park seat, and the buzz of summer has always been one of my favorite traditions.  I've always loved the Rangers, but now I love them for who they are, and not just what they do.  In particular, I love this guy.....
..he beat the odds, has an amazing testimony, and walks the walk.  Drugs and alcohol didn't alter his playing, they ruined his life.  Anyone who has watched someone they love struggle with alcohol and drugs knows the grip those have over a person's life, and the seemingly insurmountable odds of getting it out of your life so you can HAVE a life.  An encounter with God, and accountability from that point forward brought Josh to where he is today, in the running for an MVP, and playing in the World Series with a team that's made it's trip there for the first time, and hopefully not the last.  His story is here
P.s.   I wish these pictures were from the games this week, but they are from a game in early fall.  If you live in the Dallas area, on Friday nights, the Rangers have a fireworks show to music after the game. 
They flip off the lights, the players drag blankets and their families out on the field to join the crowd, and the festivities are extended for just a moment longer. 

Her Modeling Days Are Over

Saturday, October 30, 2010 3 comments
I started to post this little episode when it happened, but nothing is ever funny when it comes with a vet bill. With some distance, and a costume holiday looming....I found this picture, and I think it's time to share Lilly's early Halloween costume. This year, she will be a unicorn.

She was supposed to be a dog-under-bandage-for-a-split-ear-that-I-have-no-idea-how-she-cut, but certainly REMEMBER she cut b/c I'm still cleaning up the blood.
The bandage didn't even stay on past the point of walking out of the vet's office. (The vet was out and this was a substitute that maybe needs a little more work on bandaging).
When I took her in, the option for a split ear is surgery....but the only purpose is cosmetic, and I told Lilly she is just going to have to get over her dream of modeling b/c I don't think anyone is going to book a dog with a permanently, split ear.
After a bill that made me want to cry....I needed to turn this into a positive. My dogs never get outfits....and they certainly don't get Halloween costumes, but this year....Lilly got one. I would take a gander and say I bet my dog's 'costume' cost more than any of my friend's kiddo's costumes this year.  I would have said she went as a mummy, but there is that weird point that is supposed to be housing her ear, the one sticking out the side with it's little slit and dried blood, that one. Lilly wanted me to say, 'Trick or Treat.' Knowing her, don't choose 'Trick.'

Apple Cider Apple Cups

Friday, October 29, 2010 1 comment
I saw a picture of these cute little apple cider apple cups here.  Hello, how precious are apple cups?  The process was simple, and a tray of these would be so stinking cute at a party.  I'm going to have a party just so I can serve apple cider in an apple.  I'm also thinking about starting a blog completely dedicated to apples, and a side of cinnamon b/c I find myself seeking these ingredients far too often, and if I didn't insist on adding butter and sugar everytime I chopped up an apple, it might not be such a bad thing.  Anyway, just to amuse myself, here's the quick and easy dish on creating apple cups. 
I chopped off the top (in retrospect, it would have been cute to pop the top back on as well.  I'll remember that for my imaginary party.  I also anticipate it might be necessary to chop a small bit off the bottom of the apple for a flat seat, though this guy sat pretty firmly on the counter. I melon balled out the apple, and reserved  the pieces in the freezer for a pie sometime.   (Don't dig too deep with the melon baller, or the cup will spring a leak.   I ran the apple through a sprite bath (lemon would also work).  Inserted my cider, added a cinnamon stick, and called myself content. 

Zucchini Bread In-A-Can

Thursday, October 28, 2010 19 comments
I love zucchini bread.  You can't taste the zucchini, but it gives this cinnamon-ee bread a moist texture.   I made this to go with a larger gift, which I'll share sometime soon, but first....I needed to give the bread it's own post.  I've seen breads in cans before, and I should also say, I've read there are some chemicals in cans that some believe makes this process unsafe, so be warned if that's the sort of warning you want to take head of, and just bake your bread in the traditional tins.  I've seen beans cooked over fire stoves in cans for years, and I figured if I only do this every ONCE in awhile, it'll be OK.  I like the way bread looks in a can, and it's an affordable way to give a gift.  :O)  Here's the recipe, and instructions if you want to live life on the tin can edge with me. 

Zucchini Bread
Ingredients:
3 c. flour, 1 t. salt, 1 t. baking soda, 1 t. baking powder, 3 t. cinnamon, 3 eggs, 1 c. vegetable oil, 2 1/4 c. sugar, 3 t. vanilla, 2 c. (peeled) grated zucchini (about 2 medium zuchhinis), 1 c. chopped walnuts
Instructions: 
1.  Grease 6 empty/cleaned vegetable cans (or 1 8x4 inch bread pan)-I use Baker's Joy with flour. 
2.  Sift flour, salt, soda, powder, and cinnamon in a bowl.
3.  Beat eggs, oil, vanilla, and sugar and then add in sifted ingredients and beat well. 
4.  Fold in zucchini and nuts. 

5.  If you are using the cans, I filled mine to a little over half full of batter, and the popped up perfectly.  I wanted a tiny bit peeking over the edge. 

6.  Bake 40-60 minutes.  (My cans took about 45 minutes total for a tester to come out clean). 
I put a piece of syran wrap over the cooled bread, cut a circle of wax paper, and held it on with a rubber band, which I later covered with raffia. 
This freezes well, and can be stored in the fridge for a week++.  :O)
Linking To:
Free Pretty Things For You
It's a Blog Party
Pretty Packages
Keeping it Simple
Remodelaholic
CRAFT
Crafty Soiree
Tatortots and Jello
Along for the Ride
Funky Junk
Be Different...Act Normal
Under the Table and Dreaming
Anything Related
Sassy Sites
House of Hepworths
handmade projects
Photobucket

Lisa's Pumpkin Dip

Wednesday, October 27, 2010 5 comments
Lisa was known for her pumpkin dip at work.  She's moved on to a new position, and I guess her co-workers there will get to enjoy her dip this fall.  She was nice enough to share the recipe before she headed on her way, and I made it this year, since I wouoldn't be enjoying it a la Lisa!  :O(  It's a really fun fall flavor for harvest-ee meals.  Or just because-es.  It's really pumpkin-ee, so....love of pumpkin flavors is a must.  It also makes a TON.  I like this dip with the gingersnaps (I snagged these from Cost Plus World Market)
Pumpkin Dip Recipe
Mix:  Use a beater to beat, softened, 8 oz of cream cheese, 1 c. powdered sugar, 15 oz can of pumpkin, 1 t. cinnamon, 1/2 t ginger (I also added a dash of nutmeg and pumpkin pie spice, just because I could).  Keep chilled until serving. Serve with gingersnaps and apple slices.

Laissez Le Bon Temps Rouler

Tuesday, October 26, 2010 7 comments
Last week, I headed to New Orleans for a work conference.  I've been eagerly awaiting an opportunity to get back to New Orleans.  I went once, more than ten years ago, and I loved the city, and I wanted to explore it as an adult.  I've really wanted to go post Katrina, and was impressed by how well things were hopping during my visit.The conference I attended over four days was excellent (In addition, I laughed so hard with the company I kept, it was hard to convince anyone we were, actually, sober), but work did prevent us from getting to explore a lot of the city during the daylight hours (shock), and a lot of the historical buildings were closed by the time we got out of our meetings.  I need to go back and take more pictures.  The injustice, I know.  Life is so rough.   Having said that, we did get a chance to walk along the French Quarter, look at the architecture, obsess over the iron work (maybe that was me?), and eat great food.  I have a week of Mardi  Gras projects planned for this winter, but I must admit, considering how crowded Bourbon Street was during the middle of the week in October, I'll cross attending Mardi Gras off the future list.  So, if Mardi Gras isn't the time to go, I have to recommend October, the weather was fabulous.  Here are a few of my favorite things. 
The last time I went, I missed Cafe du Monde, this time, we headed there on the first night. 
Yes, beinets really are that fabulous.  Heather said it best, they taste like funnel cakes, but....better!  And while I'm speaking of food (which I'm a little bit of an expert on after as much eating as I did).  We went to a restaurant in the French Quarter called Irene's.  It was the best meal we had, hands down (thanks for all the advice from the people I pestered in advance, we took it, and I saved the ones I wasn't able to utilize this trip).  My very favorite pralines were from a company called Sweet Sensations.  I loved the Creamy Pralines, but they also had an Amaretto Praline that was to die for from the same company (sold in random stores)!  We also hit up Brennan's at the advice of many people, and as the guide book said, I ordered a banana foster. 

The fire display was impressive, but, in the end, Irene's is the place I'd recommend.  One thing I have to note about New Orleans, the wait staff didn't give change, really, they kept it unless you asked for it, this included everyone from the street vendors to nice local restaurants. 99.9 percent I tip much more than the change (too many of my friends have worked service, and so I tip for all the non-tippers), but I like to have the option.  We had some great service, and some of the worst service available, but consistently good food, and consistently...no change. 
We enjoyed some jazz on Bourbon Street the second evening. 
What I love about New Orleans are all the open patios, and restaurants, thanks to this open atmosphere jazz seeps out from all throughout the French Quarter as you walk along. 
New Orleans at night is covered with street artist, ghost walking tour guides, tourist indulging in drink on the street, ...and then trying to traverse the broken sidewalks (compliments of all the enormous trees shading the pathways), police patroling the legal street drinking, locals wearing, umm, limited clothes, horse drawn carriage tours, and music.  I love all the old buildings, the iron, and statues...
Trolley Cars....
...and the beads that tell of  past parades and adventures. 
They hang from trees, lamp post, electrical lines, shop racks, and the necks of tourist.  They are more prominent than mask. 
On our second full day in town, we headed via trolley to Magazine Street.
I don't think we made it to most of the shops we read about, but we did walk by a cemetery in the garden district.  It was supposed to have closed at 3, but they were late in closing, so we were able to walk in quickly. 
New Orleans is below sea level, so there are rows and row of  burial sites that rest above ground level.  Most are so close together, it's almost impossible to walk through the rows, but they are really beautiful, old tributes with detailed stories about the families that rest here. 
After 4 days of shops, eating, conferencing, and eating, with a stop or ten to eat....  I know I'll be back, I have to, the shops were mostly closed, the plantations were totally ignored, and there are far too many desserts that need my attention,  they need me. 
Minus a few hundred pictures of iron 'letters,' and the typical, black mail photos I collected, here are some more photos.
Linking To: 
French Obsession

In honor of the Pumpkin: Pumpkin Pie Cake

Monday, October 25, 2010 7 comments

My friend, Debbie brought this a few years ago, and it is soooo delicious. I felt like it was time to whip it out since fall=pumpkin desserts. I make it when I take people desserts, and they ask me back, and they usually ask for the recipe. If Debbie makes it, you can be sure it's one of the yummiest things you'll ever place in your mouth.
Ingredients:
3 whole Eggs
15 ounces, weight Canned Pumpkin
¾ cups Sugar
4 teaspoons Pumpkin Pie Spice
12 ounces, fluid Evaporated Milk
1 package (18.25 Oz. Box) Yellow Cake Mix
1 cup Chopped Pecans
¾ cups Butter
1 container Whipped Cream
Directions:
1. Heat oven 350 degrees.
2. Butter a 13×9 pan.
3. In a large bowl, whisk eggs, pumpkin (make sure it’s just canned pumpkin, and NOT the pumpkin pie mix), sugar, and pumpkin pie spice. Stir until smooth. Add evaporated milk, and stir to blend.
4. Pour into pan, and sprinkle the dry cake mix over. Spread out chopped pecans. Drizzle with melted butter.
5. Bake for 45-55 minutes, until a knife inserted in the center comes out clean.
6. Cool completely to serve. Add whipped cream if you want.
Linking To:
All Things Related
It's a Blog Party
Love Stitched

Halloween Tote Bag

Sunday, October 24, 2010 3 comments
I saw this super cute pattern here for a precious little Trick or Treat Bag....or lunch bag for those of us too old to trick or treat without being egged, or arrested-or something.  I believe that's called discrimination, I too have the right to free candy, I'll get back to you when I find that line in the constitution, and make my picket sign for the lawns of the Supreme Court.   I fell in love with the kitty on the bag, and the gal who shared this pattern for free!  The internet is a magical land.  I printed it off, traced the design on muslin, and worked on it during my nights away from home.   Embroidery is fun, it's like coloring with a needle, but I use the word 'embroidery' very lightly here, in the-'it's art, are there really rules?' sort of way, and if your answer is 'yes there are rules' I'm not actually looking for anyone but myself to answer that, I usually agree with myself.  I then added some black dotted fabric and made handles with additional muslin, a liner, sewed all the right sides together....

Turned it all right side out.  Called Coach, and other major handbag designers to let them know to watch out....

Sewed the two inside edges together, and tada.....a little Halloween lunch bag. 

Mummy Bread

Saturday, October 23, 2010 2 comments

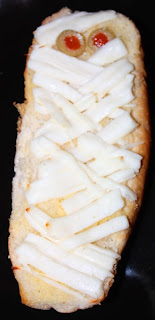
I've seen mummy pizzas all over magazines lately, and so I decided to make my own version.  I did not, unfortunately, decide to worry about the white balance of the finished product. 
I was going to buy hot dog buns so these were smaller sized, and everyone (of my imaginary friends) could have a mummy.  To experiment, I grabbed hoagie buns this go round, and string cheese. 
I cut the buns in half, sprayed them with spray butter, garlic salt, and then little strips of string cheese. 

I was able to cover 1 hoagie bun with one string cheese.  I added olive eyes.  I'll probably grab black olives next time around, just because, but I used what was already in my fridge.  I baked at 350 for about ten minutes, and it was a yummy treat.  Next up, finding friends to come eat my mummies.

The Best Pumpkin Cupcakes On Planet Earth

Friday, October 22, 2010 6 comments
Oh my goodness!  I found a recipe for pumpkin cupcakes at Taste of Home, and I was fascinated by the adorable pumpkin topper, but the second little tidbit is the cupcake is de-lic-ious!  I have nothing more to say!  Well, other than providing the recipe, it won't be the last time I bake up these little beauties! 
Pumpkin Cupcake Ingredients (makes 21)
2 c. sugar, 3/4 c. canola oil, 1 (15 oz) can solid-packed pumpkin, 4 eggs, 2 c. flour, 2 t. baking soda, 1 t. salt, 1 t. baking powder, 1 t. cinnamon
Pumpkin Cupcake Recipe
1.  Combine sugar, oil, pumpkin, eggs.  Combine the flour, baking soda, salt, baking powder, cinnamon, gradually add to pumpkin mix and beat until well mixed. 
2.  Fill paper-lined muffin cups two-thirds full.  Bake at 350 for 18 minutes (until toothpick in the center comes up clean). 
3.  Cool, and then carve out the middle of the pumpkin with a knife. 
Filling Ingredients
1 T. cornstarch, 1 c. milk, 1/2 c. shortening, 1/4 c. butter (softened), 2 c. confectioners' sugar, 1/2 t. vanilla, pretzel stick (optional)
Filling Instructions1.  Combine cornstarch and milk in a saucepan until smooth.  Bring to a boil, stirring constantly.  Remove from heat; cool to room temperature. 
2.  In a large bowl, cream shortening, butter, and sugar until light and fluffy.  Beat in vanilla.  Add cornstarch mix gradually.  Beat until smooth (I added at least another c. of powdered sugar because mine was really runny, and I added another 1/2 t. of vanilla.  It never did get very fluffy, but it was yummy.  It was fine for this cupcake b/c it's rest in the center like a filling, and hardens a little overnight.  I thought about trying a cream cheese frosting, but in the end, I think this light icing is right for these yummy cupcakes, and it's even better after resting.  Desserts don't get to rest often in my house.). 
3.  Spoon filling into pumpkins. 
4.  Add pretzel stick to the top for the 'pumpkin stem,' and replace over filling. 
Linking To:

Spooky Chili

Thursday, October 21, 2010 6 comments

Since I have a degree in rocket science from the University of Yeah Right, I was able to conduct this very difficult Halloween experiment.  I saw this idea in a magazine I was flipping through in line at the grocery store.  It was flip through the magazine, or pull my hair out....or the hair out of the person in front of me, or throw a tantrum like the kiddo behind me.  I wasn't feeling very patient, so I went to my happy place:  magazine flipping.  Anyway, basically I took processed cheese (I have a minor in nutrition from the same university), stamped out a shape with 1 of 254 Halloween cookie cutters I own, and slapped it onto a bowl of chili.  It would have worked on soup as well, or it would be cute in mini bowl of hot offerings on a buffet if I were hosting a Halloween party.  I'm not.  It would require going to the grocery store to get groceries and I can't go back there.  I can't.  There are lines.  I'm not good at lines.
Dollar Store Treat Bucket

Wednesday, October 20, 2010 3 comments
This probably won't rock too many people's world, BUT I will say I saw these buckets on sale for 10+ dollars at Canton (a huge craft/antique sale held monthly in Texas).  I recognized the buckets they were using to 'personalize' each treat bucket as one they currently have at the Dollar Tree, and I decided to try my hand at a quick treat bucket.  The buckets they were selling could be personalized for an additional fee with vinyl names for Trick or Treating.  This is my first toe dip into the world of vinyl, and I like it.  I have more letters because I bought a vinyl pack, so it won't be the last vinyl dip I take.  Basically, I grabbed some vinyl letters (they sell these packs for a couple bucks at Walmart, and Michael's), I acquired orange vinyl (thanks, Heather), and cut out circles. 
What I LOVED about the vinyl was it was easy to peel off, and push back down and move around until I had it placed just like I liked it.  This go 'round it was a TREAT bucket, next up for me, a trick bucket.  I want my trick or treaters to have choices.  I didn't think writing my name on the bucket and working the candy bowls in the neighborhood would fly.  There are not too many 31 year olds collecting the good candy these days, though I get plenty of parents holding bags as they 'take' their kids around.  They better come with a cute bucket if they want the candy in my bucket.

Pumpkin Tortilla Roll Ups

Tuesday, October 19, 2010 3 comments
I  saw this idea in a Family Fun Halloween magazine.  I thought it was a really cute, and easy appetizer idea for a Halloween party, or a lunch.  They used parsley on the tops of their pumpkins, I used these baby basil leaves just for the picture (the only think that dared survive a summer in my backyard, and are now completely gone for the same of this picture).  I think in Family Fun, they used meat and chees to make their roll ups, but I love cream cheese and salsa.  Basically, you soften an 8 oz thing of cream cheese, then stir in about 1/2 c. of salsa (or more to your taste), spread it across the (tomato basil-orange) tortilla, roll, slice, eat the ends that aren't perfect, add your pumpkin leaves, and move on with your life. 

Breast Cancer Cupcakes: Strawberry Sweetness

Monday, October 18, 2010 3 comments
A few years ago I snagged a Strawberry Cupcake from Sprinkles in honor of breast cancer.  They had cute little fondant ribbons on top.  I've since seen the Strawberry cupcake recipe online, so I decided I needed to try it out, with a little twist for the top. 
Pink cupcakes are in season any month of the year, but pink takes on a new meaning during the month of October. 
Below are the ingredients for the cupcakes, the cupcakes are a little less moist than a like them, but add the sweet icing and they balance each other out well.  The recipe makes 12 cupcakes.  I cannot verify what happened to cupcake number 12. 
Ingredients for the Cupcakes:
2/3 cup whole fresh or frozen strawberries, thawed (I used fresh), 1 1/2 cups all-purpose flour, sifted, 1 teaspoon baking powder, 1/4 teaspoon salt, 1/4 cup whole milk, room temperature, 1 teaspoon pure vanilla extract, 1/2 cup butter, room temperature, 1 cup sugar, 1 large egg, room temperature, 2 large egg whites, room temperature
Instructions for the Cupcakes:
1.  Preheat oven to 350 degrees. Line a 12-cup muffin tin with cupcake liners; set aside.
2.  Place strawberries in a small food processor; process until pureed. You should have about 1/3 cup of puree, add a few more strawberries if necessary or save any extra puree for frosting; set aside (1 carton of strawberries was more than enough).
3.  In a medium bowl, whisk together flour, baking powder, and salt; set aside. In a small bowl, mix together milk, vanilla, and strawberry puree; set aside.
4.  In the bowl of an electric mixer fitted with the paddle attachment, cream butter on medium-high speed, until light and fluffy. Gradually add sugar and continue to beat until well combined and fluffy. Reduce the mixer speed to medium and slowly add egg and egg whites until just blended.
5.  With the mixer on low, slowly add half the flour mixture; mix until just blended. Add the milk mixture; mix until just blended. Slowly add remaining flour mixture, scraping down sides of the bowl with a spatula, as necessary, until just blended.
6.  Divide batter evenly among prepared muffin cups. Transfer muffin tin to oven and bake until tops are just dry to the touch, 22 to 25 minutes. Transfer muffin tin to a wire rack and let cupcakes cool completely in tin before icing.
Ingredients for Frosting (This frosting is am-az-ing!):
1/2 cup whole frozen strawberries, thawed (I used the puree I made from the fresh strawberries),  1 cup (2 sticks) butter, firm and slightly cold,  Pinch of salt,  3 1/2 cups confectioners' sugar, siftedm,  1/2 teaspoon pure vanilla extract
Instructions for Frosting: 
Place strawberries in the bowl of a small food processor; process until pureed. In the bowl of an electric mixer fitted with the paddle attachment, beat together butter and salt on medium speed until light and fluffy. Reduce mixer speed and slowly add confectioners' sugar; beat until well combined. Add vanilla and 3 tablespoons strawberry puree (save any remaining strawberry puree for another use); mix until just blended. Do not overmix or frosting will incorporate too much air. Frosting consistency should be dense and creamy, like ice cream.
I added a swirl of icing (the recipe makes PLENTY of icing), and then dipped strawberries in chocolate and popped them on top. 
Linking To: